So far in this series of articles we have explored what Semantic Search is all about, we’ve looked at the opportunities it brings to small businesses, and we’ve seen how you can set up your Google+ profile properly. Hopefully by now you’ve got a good idea of what we’re trying to achieve with all this work, and maybe you have already started building up your Google+ circles in preparation for promoting your content? If not, then there are many different approaches that can be made to organising and building your circles, but this course on the Plus Your Business website will give you the basics.
Why set up Authorship on your Website?
The next step in getting ready for Semantic Search is to link your website content back to your Google+ profile. Why? Simply because this closes the loop and lets Google know who is the author of the content.
If you remember, we set up your Google+ profile to be, in Google’s eyes, your definitive online identity. By linking the blogs and articles you create online back to this identity, it allows you to build up a trove of content that Google recognises as belonging to you.
Over time you will naturally build up more and more content, and that content will be assessed by Google and it will impact on your online authority.
But you can’t just create any old content. It needs to be useful, and Google use a number of techniques in order to determine how useful it is. Most of those have been familiar for some time – the presence and frequency of relevant keywords, the length and readability of the article, the amount of links to it (both from websites and social media) and so on.
In the past the authority of a single article or blog remained tied to that website. With Authorship, your Google+ ID now benefits too. It’s a fundamental change to SEO, and it requires that you link your content appropriately. So let’s look at how you do that.
Why WordPress?
Before we do, one quick aside. We’ll be looking at setting up a self-hosted WordPress site (i.e. wordpress.org and not wordpress.com) for a couple of reasons:
- WordPress is the most common Content Management System (CMS) in use today for websites link
- WordPress is under constant development, both the core product and the many, many plugins (extensions to the functionality) so it usually keeps pace with the latest in web technology
- There is a thriving market of themes (designs) for customer to choose from so they can achieve just the sort of look and feel they need
- We create customer websites using WordPress, (for some very good reasons) so we know the platform better than anything else
- We believe it is a great choice for small and medium businesses for their website
So let’s have a look at setting up Authorship on your site.
WordPress out of the box
I’m assuming you have managed to get WordPress installed, either using your web hosting providers ‘one click install’ facility, or the famous WordPress 5-minute install. Either way, it’s up and running and you’re now faced with the initially daunting admin panel.
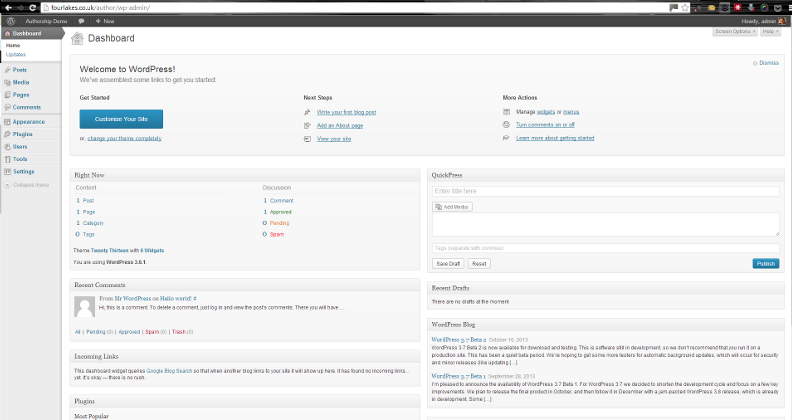
As it stands, the site does not have the facility to implement authorship. Nor will it contain the ‘rich snippet’ information that will make it semantic search friendly.
Adding Authorship to a WordPress website
So let’s look at one easy way to add Authorship capabilities. It’s not the only way, and other WordPress developers may tell you something different. That’s OK, it’s just a reflection of the flexibility of the platform.
My personal preference is to use an SEO plugin called “WordPress SEO by Yoast“. It’s a very flexible plugin that offers, for free, a wide range of facilities to boost the search engine friendliness of your website. Even without the Authorship facility I would recommend it, so this makes it even more useful.
Installing it is simple:
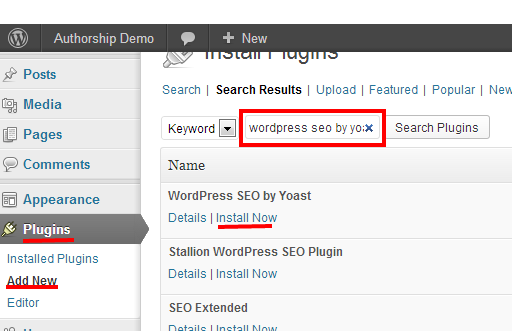
- Hover over ‘Plugins’ on the left-hand side
- Click on ‘Add new’
- Type ‘wordpress seo by yoast’ in the search box and click on ‘Search Plugins’
- Click on ‘Install Now’ under the relevant plugin listing
- Confirm that you really, really want to install this plugin
- Click on ‘Activate plugin’ when the install is complete
You’ll be asked if you want to allow tracking. This helps the plugin developers understand how the plugin is being used and ultimately benefits everyone, so I’d recommend you do so.
You will end up with a new menu on the left-hand side called ‘SEO’. If you go to the ‘Dashboard’ sub-menu then there is a brief tour which takes you through the various settings for this plugin. It’s worth familiarising yourself with these as they will benefit your website. However, we’ll just have a look at the Authorship-specific settings for now.
Setting up rel=publisher
Publisher? This is something we haven’t talked about much, and it’s not essential to enabling Authorship. However, it’s useful as it provides a link between your website and your company profile page on Google+.
If you’re in business and you haven’t got a company page, then you should set one up now. The reasons are many, but in short it’s about having a brand identity on G+ that you can use to engage customers and prospects.
So, in order to make that link from your website to Google+ you have to follow these simple steps…
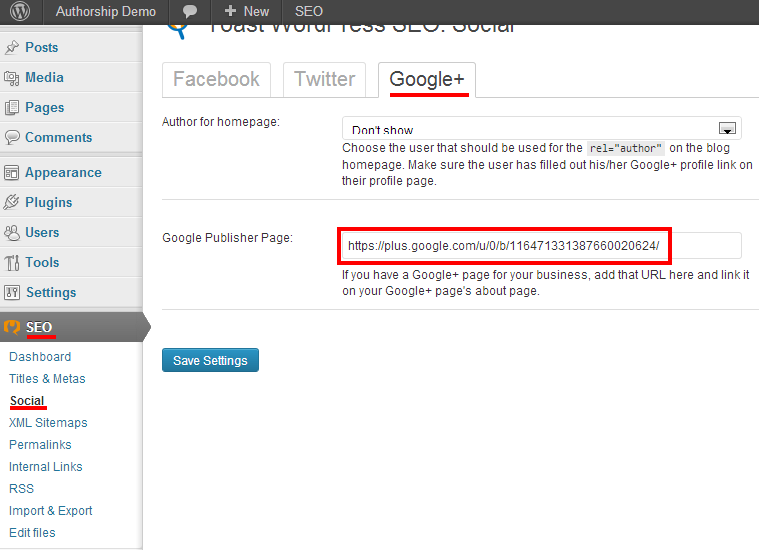
- Click on SEO | Social
- Click on the Google+ tab
- Enter your Google+ Page URL into the ‘Google Publisher Page’ field
- Click on the ‘Save Settings’ button
That’s it! You have now set up the publisher link. Easy, huh!
Setting up Authorship
OK, setting up the rel=publisher link was easy, so lets have a look at what’s needed to set up Authorship.
Remember, the purpose of Authorship is to link the in-depth content that you create to your Google+ profile. That way Google can determine your level of expertise and rank your content accordingly in search results.
WordPress already has one of the important building blocks in this process, as all content (i.e. static pages, blog posts, and other content types dependant on the theme) have the internal author linked already. So in order to extend that link back to the Google+ profile we have to do one simple thing…
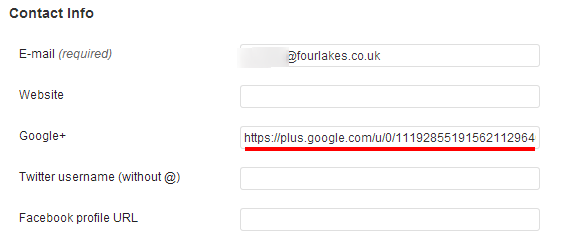
- Click on ‘Users | All users’
- Choose to edit the appropriate user profile (in case it’s not yours)
- Put the user’s Google+ profile URL in the Google+ field within the ‘Contact Info’ section
That’s it! Now every page on the site that is linked to that Author will have the correct ‘rel=author’ markup applied.
Hold on, though. There’s one more thing you really should do to finish the job off properly. Right near the bottom of the user profile there’s a section that could use a little love…

Putting appropriate details in here makes sure that the Author’s archive on your site has meta information that makes sense. You’d hate for your online profile to be raise through all this Authorship effort, and for that to be undermined by not having a good author page on your own site, right?
So that’s it. Your site should now be set up properly for Authorship, even if you have multiple authors.
Testing it out
It’s always good to have a way of testing your code changes, and Google have provided a very useful tool that will tell you if your attempts to set up Authorship have been successful. It’s called the Structured Data Testing Tool, and you should use it to validate the work you’ve carried out. It’s a very simple process, you merely have to enter the URL of the page you wish to validate and the tool will list out the relevant structured data elements, as well as showing how the page will look in search results. This allows you the opportunity to make sure your carefully chosen profile picture really will work in this format.
The tools shows other kinds of structured data, as we will look at in a later article. For Authorship you simply need to look at the ‘rel=author’ and, if implemented, the ‘rel=publisher’ elements.
Not using WordPress?
We’ve focussed on instructions for WordPress in this article, but there are, of course, many other ways of creating a website. However, the same principles still apply to setting up Authorship, regardless of platform…
- Have a ‘rel=publisher’ link to your Google+ business page in the website header (recommended)
- Have a ‘rel=author’ link to the author’s Google+ page in the header of appropriate pages (i.e. contain information or opinion, and are authored primarily by them)
- Have a page that summarises the author’s content on the site, also linked using ‘rel=author’
If you are using another CMS then there may be add-ons that achieve this in a manner similar to the WordPress SEO plugin described above. If not, then the code changes are pretty trivial.
The next steps
Once Authorship is set up, you are ready to start putting your amazing insights and fresh information onto your website, secure in the knowledge that that’ll be appropriately presented to searchers. But there are some further enhancements you can make that, much of the time, will give your content even more of a boost on the Semantic Web. In the next article we’ll look at how you can enable these on your website too, and make your website fly!
If you’d like to receive these articles straight to your mailbox, in a convenient monthly summary, then please sign up to our newsletter in the side-bar. Or you can follow me on Google+, Facebook, Twitter or LinkedIn but clicking on the links below.
Image courtesy of vignetfishnet
Coleman,
Want to thank you for this instructional tutorial on “Setting Up Authorship”. Excellent step-by-step instruction.
Jim Riddle
Glad you found it useful, Jim!